
* Tensorflow 1.9 버전에서 Slim을 사용하기 위한 튜토리얼 리비전 입니다.
1. 윈도우에 Tensorflow GPU 버전 설치하기
2 딥러닝 slim 라이브러리 설치, 학습, 평가하기
3. 내 이미지로 학습 하기 ( caltech 이미지 사용 )
4. 학습된 모델 사용하기
드디어... 드디어... 마지막 장입니다. 3장에서 4장을 넘어 오는데.. 많은 시간이 걸렸네요. 개인적으로 많은 일들이 있어서... 이제 다 정리되고 다시 제자리로 돌아왔습니다.
3장까지 잘 따라 오셨다면 이번 장은 아주 쉬울 겁니다. 학습된 모델에 내가 원하는 이미지를 넣어보고 그 결과를 확인해 보겠습니다.
* 여기에 사용된 코드는 slim 폴더에 있는 slim_walkthrough.ipynb 을 참조해서 만들었습니다.
 코드 설명은... 음... 저도 잘 모르지만.. 제가 바꾼 코드는 10 라인 checkpoints_dir 를 저희가 사용한 실습 데이터 경로로 정해줬고요. 리눅스였다면 디렉토리 경로를 '/'로 해줘야 하지만 저희는 윈도우에서 사용하고 있기 때문에 '\'를 써야하고 문자열에서의 '\'는 특수 기호이기 때문에 '\\' 이렇게 써줘야지 잘 인식되게 됩니다.
18라인 image_input = tf.read_file("080_0010.jpg")
slim 폴더에 위 파일을 복사해서 넣어 두었습니다. 080_0010.jpg 는 \\tmp\\caltech256\\caltech256_photos 디렉토리의 080.frog 폴더 아래에 있는 파일중 하나입니다. 폴더 이름에서 알 수 있듯이 개구리 사진입니다. 과연 저희가 학습한 모델이 이 사진을 개구리라고 분류할 수 있을까요? (잠시후 확인하시죠)
27라인 logits, _ = inception.inception_v1(processed_images, num_classes=257, is_training=False)
원 코드에는 1001로 되어 있으나 우리의 모델은 257개의 클래스로 분류를 하기 때문에 257로 변경 시켰습니다. 학습된 모델의 클래스와 이 수가 다르면 에러가 발생 되게 됩니다.
31라인 os.path.join(checkpoints_dir, 'model.ckpt-500'),
모델 이름을 적어 주었고요.
45라인 names = os.listdir("\\tmp\\caltech256\\caltech256_photos")
분류된 결과는 인덱스(숫자)로만 출력이 되기 때문에 그 인덱스가 의미하는 라벨이 뭔지를 같이 보여주면 결과를 더 잘 확인 할 수 있습니다. 우리의 인덱스는 위 폴더 이름을 그대로 인덱스로 만들어 졌기 때문에 폴더명을 읽어서 names에 저장하였습니다.
자! 이제 한번 실행시켜 볼까요!
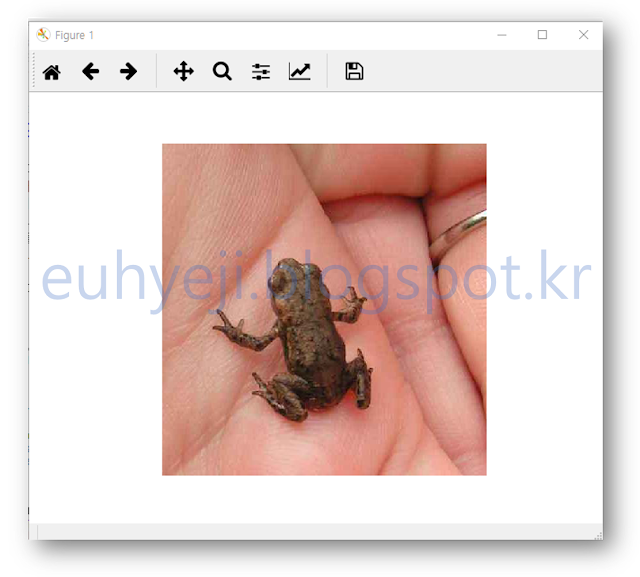
개구리! 아나콘다 프롬프트에는 아무런 결과가 표시 되지 않는군요. 이 이미지 창을 Close 시켜 보겠습니다.
 네! 위와 같이 위 이미지를 우리가 학습한 모델을 통과 시킨 뒤의 결과를 확인 할 수 있습니다. 60%의 확률로 080.frog로 예측, 분류를 했습니다.
(위의 결과처럼 080.frog 로 예측이 되지 않는다면 3장 [학습 2번 과정] 에서 Fine-tune 학습시 --max_number_of_steps=500 의 값을 1000 이나 그 이상으로 횟수를 늘여 모델의 예측 정확도를 더 높일 수 있습니다.)
위의 코드 중 18라인의 이미지 파일을 변경해보면서 테스트 해보시기 바랍니다.
아래와 같이 한 파일로 만들었습니다. 아래 코드를 Images_Classification_Caltech256.py 저장 하겠습니다.
 위 예제는 학습과 평가에 사용한 Caltech257 Dataset에서 이미지를 가져와 분류를 한번에 시켜보는 예제였습니다.
그렇다면... Dataset에 정의 되지 않은 이미지들을 한 폴더에 모아놓고 한번에 분류를 시키려면 코드를 어떻게 수정해야 할까요???
아래 코드를 UserImages_Classification_Caltech256.py 이름으로 저장해주세요.
기존 한장 이미지 분류에 사용했던 코드(Image_Classification_Caltech256.py)에서 이미지들을 변수 하나에 쌓아서 모델에 넣는 코드를 추가 하였습니다.
구체적으로 18,19 라인에 복수의 이미지를 저장하는 변수가 선언 되어 있고요.
21라인에서 이미지 파일 이름을 불러와
23~28라인에서 이미지 여러장을 변수 하나에 넣었습니다.
34라인에 여러장 쌓인 변수(user_processed_images)를 모델에 그냥 넣으면 되고요
43라인에 원본 이미지도 여러장이 쌓인 변수(user_images)를 넣어주기만 하면 됩니다.
분류된 결과는 43라인의 np_images에는 이미지들이 배열로 저장되고, probabilities에는 해당 이미지의 분류 결과가 역시 배열로 저장되어 있습니다.
48~59라인에서 이미지 파일 갯수(인덱스)에 따라 순차적으로 그 결과를 표시하는 코드 입니다.
위 코드에서는 user_images 라는 폴더안에 분류하고 싶은 이미지들을 복사해두고 아래 명령어를 아나콘다에서 실행 하겠습니다.

처음엔 TF-slim 에서 다 만들어 놓은 코드를 가져다 쓰기만 했는데 이렇게 사용 목적에 맞게 코드를 만들고 수정해 보니 더 재미가 느껴지는거 같습니다.
그동안 허접한 튜토리얼 따라 한다고 고생이 많았습니다. 다음 튜토리얼은... 이왕 윈도우에서 Tensorflow를 이용한 딥러닝을 한 마당에... 윈도우에서 동작되는 딥러닝 어플리케이션을 만들어 볼까 합니다. 찾아보니 TensorflowSharp 이라는 오픈소스가 있는 것이 확인 되네요. 다음 튜토리얼을 기대해 주세요.
1. 윈도우에 Tensorflow GPU 버전 설치하기
2 딥러닝 slim 라이브러리 설치, 학습, 평가하기
3. 내 이미지로 학습 하기 ( caltech 이미지 사용 )
4. 학습된 모델 사용하기
드디어... 드디어... 마지막 장입니다. 3장에서 4장을 넘어 오는데.. 많은 시간이 걸렸네요. 개인적으로 많은 일들이 있어서... 이제 다 정리되고 다시 제자리로 돌아왔습니다.
3장까지 잘 따라 오셨다면 이번 장은 아주 쉬울 겁니다. 학습된 모델에 내가 원하는 이미지를 넣어보고 그 결과를 확인해 보겠습니다.
* 여기에 사용된 코드는 slim 폴더에 있는 slim_walkthrough.ipynb 을 참조해서 만들었습니다.
4.1 이미지 한 장 분류하기
이번 실습에서는 아래 파이썬 코드를 직접 코딩하여 Image_Classification_Caltech256.py 로 저장하겠습니다.
18라인 image_input = tf.read_file("080_0010.jpg")
slim 폴더에 위 파일을 복사해서 넣어 두었습니다. 080_0010.jpg 는 \\tmp\\caltech256\\caltech256_photos 디렉토리의 080.frog 폴더 아래에 있는 파일중 하나입니다. 폴더 이름에서 알 수 있듯이 개구리 사진입니다. 과연 저희가 학습한 모델이 이 사진을 개구리라고 분류할 수 있을까요? (잠시후 확인하시죠)
27라인 logits, _ = inception.inception_v1(processed_images, num_classes=257, is_training=False)
원 코드에는 1001로 되어 있으나 우리의 모델은 257개의 클래스로 분류를 하기 때문에 257로 변경 시켰습니다. 학습된 모델의 클래스와 이 수가 다르면 에러가 발생 되게 됩니다.
31라인 os.path.join(checkpoints_dir, 'model.ckpt-500'),
모델 이름을 적어 주었고요.
45라인 names = os.listdir("\\tmp\\caltech256\\caltech256_photos")
분류된 결과는 인덱스(숫자)로만 출력이 되기 때문에 그 인덱스가 의미하는 라벨이 뭔지를 같이 보여주면 결과를 더 잘 확인 할 수 있습니다. 우리의 인덱스는 위 폴더 이름을 그대로 인덱스로 만들어 졌기 때문에 폴더명을 읽어서 names에 저장하였습니다.
자! 이제 한번 실행시켜 볼까요!
from matplotlib import pyplot as plte

import numpy as np
import os
import tensorflow as tf

from nets import inception
from preprocessing import inception_preprocessing

checkpoints_dir = '\\tmp\\train_inception_v1_caltech256_FineTune_logs\\all'

slim = tf.contrib.slim

image_size = inception.inception_v1.default_image_size

with tf.Graph().as_default():

    image_input = tf.read_file("080_0010.jpg")
    image = tf.image.decode_jpeg(image_input, channels=3)
    processed_image = inception_preprocessing.preprocess_image(image,
                                                         image_size,
                                                         image_size,
                                                         is_training=False)
    processed_images  = tf.expand_dims(processed_image, 0)

    with slim.arg_scope(inception.inception_v1_arg_scope()):
        logits, _ = inception.inception_v1(processed_images, num_classes=257, is_training=False)
    probabilities = tf.nn.softmax(logits)

    init_fn = slim.assign_from_checkpoint_fn(
        os.path.join(checkpoints_dir, 'model.ckpt-500'),
        slim.get_model_variables('InceptionV1'))

    with tf.Session() as sess:
        init_fn(sess)
        np_image, probabilities = sess.run([image, probabilities])
        probabilities = probabilities[0, 0:]
        sorted_inds = [i[0] for i in sorted(enumerate(-probabilities), key=lambda x:x[1])]

    plt.figure()
    plt.imshow(np_image.astype(np.uint8))
    plt.axis('off')
    plt.show()

    names = os.listdir("\\tmp\\caltech256\\caltech256_photos")
    for i in range(5):
        index = sorted_inds[i]
        print('Probability %0.2f%% => [%s]' % (probabilities[index], names[index]))
위 코드를 Image_Classification_Caltech256.py 로 slim 폴더에 저장하고 아나콘다에서 아래와 같이 실행하겠습니다.python Image_Classification_Caltech256.py
와우! 이미지 창이 하나 떳습니다!

(위의 결과처럼 080.frog 로 예측이 되지 않는다면 3장 [학습 2번 과정] 에서 Fine-tune 학습시 --max_number_of_steps=500 의 값을 1000 이나 그 이상으로 횟수를 늘여 모델의 예측 정확도를 더 높일 수 있습니다.)
위의 코드 중 18라인의 이미지 파일을 변경해보면서 테스트 해보시기 바랍니다.
4.2 이미지 여러장 한번에 분류하기(train images)
4.1절에서 이미지 한장을 분류하는 코드를 실습해 보았습니다. 실제 실무에서는 이미지 한장이 아니라 수백, 수천, 수만장의 이미지를 한번에 분류 시켜야 할 필요가 더 많을거 같더군요. 그래서 어떻게 하면 복수의 이미지를 한번에 분류시키게 할 수 있을까... 사실 Tensorflow 문법도 모르고, Python 문법도 잘 모르는 상태라 삽질을 많이 했습니다. 근데 알고 봤더니 slim 폴더에 보면 slim_walkthrough.ipynb notebook 파일이 있는데.. 이 곳에 다 예제가 있었더군요... 그것도 모르고... 삽질만..
아래와 같이 한 파일로 만들었습니다. 아래 코드를 Images_Classification_Caltech256.py 저장 하겠습니다.
1 2 3 4 5 6 7 8 9 10 11 12 13 14 15 16 17 18 19 20 21 22 23 24 25 26 27 28 29 30 31 32 33 34 35 36 37 38 39 40 41 42 43 44 45 46 47 48 49 50 51 52 53 54 55 56 57 58 59 60 61 62 63 64 65 66 67 68 69 70 71 72 73 74 75 76 77 78 79 80 81 82 83 84 85 86 87 88 89 | from matplotlib import pyplot as plt import numpy as np import os import tensorflow as tf from nets import inception from datasets import caltech256 from preprocessing import inception_preprocessing checkpoints_dir = '\\tmp\\train_inception_v1_caltech256_FineTune_logs\\all' slim = tf.contrib.slim batch_size = 10 images_dir = '/tmp/caltech256' image_size = inception.inception_v1.default_image_size def load_batch(dataset, batch_size=32, height=299, width=299, is_training=False): """Loads a single batch of data. Args: dataset: The dataset to load. batch_size: The number of images in the batch. height: The size of each image after preprocessing. width: The size of each image after preprocessing. is_training: Whether or not we're currently training or evaluating. Returns: images: A Tensor of size [batch_size, height, width, 3], image samples that have been preprocessed. images_raw: A Tensor of size [batch_size, height, width, 3], image samples that can be used for visualization. labels: A Tensor of size [batch_size], whose values range between 0 and dataset.num_classes. """ data_provider = slim.dataset_data_provider.DatasetDataProvider( dataset, common_queue_capacity=32, common_queue_min=8) image_raw, label = data_provider.get(['image', 'label']) # Preprocess image for usage by Inception. image = inception_preprocessing.preprocess_image(image_raw, height, width, is_training=is_training) # Preprocess the image for display purposes. image_raw = tf.expand_dims(image_raw, 0) image_raw = tf.image.resize_images(image_raw, [height, width]) image_raw = tf.squeeze(image_raw) # Batch it up. images, images_raw, labels = tf.train.batch( [image, image_raw, label], batch_size=batch_size, num_threads=1, capacity=2 * batch_size) return images, images_raw, labels with tf.Graph().as_default(): tf.logging.set_verbosity(tf.logging.INFO) dataset = caltech256.get_split('validation', images_dir) images, images_raw, labels = load_batch(dataset, height=image_size, width=image_size) # Create the model, use the default arg scope to configure the batch norm parameters. with slim.arg_scope(inception.inception_v1_arg_scope()): logits, _ = inception.inception_v1(images, num_classes=dataset.num_classes, is_training=True) probabilities = tf.nn.softmax(logits) checkpoint_path = tf.train.latest_checkpoint(checkpoints_dir) init_fn = slim.assign_from_checkpoint_fn( checkpoint_path, slim.get_variables_to_restore()) with tf.Session() as sess: with slim.queues.QueueRunners(sess): sess.run(tf.initialize_local_variables()) init_fn(sess) np_probabilities, np_images_raw, np_labels = sess.run([probabilities, images_raw, labels]) for i in range(batch_size): image = np_images_raw[i, :, :, :] true_label = np_labels[i] predicted_label = np.argmax(np_probabilities[i, :]) predicted_name = dataset.labels_to_names[predicted_label] true_name = dataset.labels_to_names[true_label] plt.figure() plt.imshow(image.astype(np.uint8)) plt.title('Ground Truth: [%s], Prediction [%s]' % (true_name, predicted_name)) plt.axis('off') plt.show() |
python Images_Classification_Caltech256.py
위와 같이 실행 시켜보면 10장에 대해서 이미지의 정답(Ground Truth)과 예측된 답(Prediction)을 순차적으로 볼 수 있습니다.

그렇다면... Dataset에 정의 되지 않은 이미지들을 한 폴더에 모아놓고 한번에 분류를 시키려면 코드를 어떻게 수정해야 할까요???
4.3 이미지 여러장 한번에 분류하기(not train images)
4.2절에서는 datasets 폴더에 caltech256.py 로 정의해 놓은 데이터셋에서 복수의 이미지를 불러와 분류를 해보았습니다. 이 포스팅에서는 데이터셋과 상관없는 복수의 이미지를 이용한 분류를 해 보겠습니다.
아래 코드를 UserImages_Classification_Caltech256.py 이름으로 저장해주세요.
1 2 3 4 5 6 7 8 9 10 11 12 13 14 15 16 17 18 19 20 21 22 23 24 25 26 27 28 29 30 31 32 33 34 35 36 37 38 39 40 41 42 43 44 45 46 47 48 49 50 51 52 53 54 55 56 57 58 | from matplotlib import pyplot as plt import numpy as np import os import tensorflow as tf from nets import inception from preprocessing import inception_preprocessing checkpoints_dir = '\\tmp\\train_inception_v1_caltech256_FineTune_logs\\all' slim = tf.contrib.slim image_size = inception.inception_v1.default_image_size with tf.Graph().as_default(): user_images = [] # 복수의 원본 이미지 user_processed_images = [] # 복수의 전처리된 이미지 image_files = os.listdir("./user_images") # 분류하고 싶은 이미지가 저장된 폴더 for i in image_files: image_input = tf.read_file("./user_images" +'/'+ i) image = tf.image.decode_jpeg(image_input, channels=3) user_images.append(image) processed_image = inception_preprocessing.preprocess_image(image, image_size, image_size, is_training=False) user_processed_images.append(processed_image) processed_images = tf.expand_dims(processed_image, 0) with slim.arg_scope(inception.inception_v1_arg_scope()): logits, _ = inception.inception_v1(user_processed_images, num_classes=257, is_training=False) probabilities = tf.nn.softmax(logits) init_fn = slim.assign_from_checkpoint_fn( os.path.join(checkpoints_dir, 'model.ckpt-500'), slim.get_model_variables('InceptionV1')) with tf.Session() as sess: init_fn(sess) np_images, probabilities = sess.run([user_images, probabilities]) names = os.listdir("\\tmp\\caltech256\\caltech256_photos") for files in range(len(image_files)): probabilitie = probabilities[files, 0:] sorted_inds = [i[0] for i in sorted(enumerate(-probabilitie), key=lambda x:x[1])] plt.figure() plt.imshow(np_images[files].astype(np.uint8)) plt.axis('off') plt.show() for p in range(5): index = sorted_inds[p] print('Probability %0.2f%% => [%s]' % (probabilitie[index], names[index])) |
기존 한장 이미지 분류에 사용했던 코드(Image_Classification_Caltech256.py)에서 이미지들을 변수 하나에 쌓아서 모델에 넣는 코드를 추가 하였습니다.
구체적으로 18,19 라인에 복수의 이미지를 저장하는 변수가 선언 되어 있고요.
21라인에서 이미지 파일 이름을 불러와
23~28라인에서 이미지 여러장을 변수 하나에 넣었습니다.
34라인에 여러장 쌓인 변수(user_processed_images)를 모델에 그냥 넣으면 되고요
43라인에 원본 이미지도 여러장이 쌓인 변수(user_images)를 넣어주기만 하면 됩니다.
분류된 결과는 43라인의 np_images에는 이미지들이 배열로 저장되고, probabilities에는 해당 이미지의 분류 결과가 역시 배열로 저장되어 있습니다.
48~59라인에서 이미지 파일 갯수(인덱스)에 따라 순차적으로 그 결과를 표시하는 코드 입니다.
위 코드에서는 user_images 라는 폴더안에 분류하고 싶은 이미지들을 복사해두고 아래 명령어를 아나콘다에서 실행 하겠습니다.
python UserImage_Classification_Caltech256.py
결과는 아래와 같습니다.( Jupyter notebook 에서 실행한 결과입니다.)
처음엔 TF-slim 에서 다 만들어 놓은 코드를 가져다 쓰기만 했는데 이렇게 사용 목적에 맞게 코드를 만들고 수정해 보니 더 재미가 느껴지는거 같습니다.
그동안 허접한 튜토리얼 따라 한다고 고생이 많았습니다. 다음 튜토리얼은... 이왕 윈도우에서 Tensorflow를 이용한 딥러닝을 한 마당에... 윈도우에서 동작되는 딥러닝 어플리케이션을 만들어 볼까 합니다. 찾아보니 TensorflowSharp 이라는 오픈소스가 있는 것이 확인 되네요. 다음 튜토리얼을 기대해 주세요.


작성자가 댓글을 삭제했습니다.
답글삭제from matplotlib import pyplot as plte에서 plte가 오타인것 같아요 ㅎㅎ
삭제what " line 16, in image_size = inception.inception_v1.default_image_size " error?
답글삭제작성자가 댓글을 삭제했습니다.
답글삭제안녕하세요. 올려주신 글들 잘 읽었습니다. 현재 이미지 한장 분류하는 것까지 잘 동작하는 것을 확인하였는데요. 실시간 프레임을 받아 분류하는 것이 도무지 해결되지 않아 질문드립니다..
답글삭제import cv2
import os
import tensorflow as tf
from threading import Thread
import time
from nets import inception
from preprocessing import inception_preprocessing
checkpoints_dir = '\\tmp\\train_inception_v1_caltech256_FineTune_logs\\all'
slim = tf.contrib.slim
image_size = inception.inception_v1.default_image_size
class Videostream:
def __init__(self, src=0):
self.stream = cv2.VideoCapture(0)
(self.grabbed, self.frame) = self.stream.read()
self.stopped = False
def start(self):
Thread(target=self.update, args=()).start()
return self
def update(self):
while True:
if self.stopped:
return
(self.grabbed, self.frame) = self.stream.read()
def read(self):
return self.frame
def stop(self):
self.stopped = True
vs = Videostream(src=0).start()
frame_count = 0
score = 0
start = time.time()
pred = 0
last = 0
with tf.Graph().as_default():
while True:
frame = vs.read()
frame_count += 1
if frame_count % 5 == 0:
#cv2.imshow("frame", frame)
cv2.imwrite("/models-master/research/slim/current_frame1.jpg", frame)
image_input = tf.read_file("/models-master/research/slim/current_frame1.jpg")
image = tf.image.decode_jpeg(image_input, channels=3)
processed_image = inception_preprocessing.preprocess_image(image,
image_size,
image_size,
is_training=False)
processed_images = tf.expand_dims(processed_image, 0)
with slim.arg_scope(inception.inception_v1_arg_scope()):
logits, _ = inception.inception_v1(processed_images, num_classes=257, is_training=False)
probabilities = tf.nn.softmax(logits)
init_fn = slim.assign_from_checkpoint_fn(
os.path.join(checkpoints_dir, 'model.ckpt-500'),
slim.get_model_variables('InceptionV1'))
with tf.Session() as sess:
init_fn(sess)
np_image, probabilities = sess.run([image, probabilities])
probabilities = probabilities[0, 0:]
sorted_inds = [i[0] for i in sorted(enumerate(-probabilities), key=lambda x:x[1])]
#plt.figure()
#plt.imshow(np_image.astype(np.uint8))
#plt.axis('off')
#plt.show()
names = os.listdir("\\tmp\\caltech256\\caltech256_photos")
for i in range(3):
index = sorted_inds[i]
print('Probability %0.2f%% => [%s]' % (probabilities[index], names[index]))
current = time.time()
fps = frame_count / (current - start)
cv2.imshow("Frame", frame)
last += 1
if cv2.waitKey(1) & 0xFF == ord("q"):
break
vs.stop()
cv2.destroyAllWindows()
sess.close()
print("Done")
Videostream을 통해 프레임을 받아 지정된 폴더에 imwrite를 통해 jpg로 저장한 후에 그 이미지를 추론하는 방식으로 코드를 짰습니다. 코드를 실행시키면 처음 한번만 inference가 되고 에러가 떠버리네요..
ValueError: Variable InceptionV1/Conv2d_1a_7x7/weights already exists, disallowed. Did you mean to set reuse=True or reuse=tf.AUTO_REUSE in VarScope? Originally defined at:
에러 내용은 대략 이렇습니다. 해결 방법 혹시 알려주시면 너무 감사하겠습니다.
저 역시 같은 문제가 발생 하는데... 해결 하셨나요?? 이것 저것 찾아 보고 있는데..저 역시
삭제해결이 안되네요...TT
친절한 설명으로 많은 도움을 받았습니다. 하나 문의 할게 있는데 jpg파일들은 인식되어 잘 학습이 되는데
답글삭제tif 파일은 "tensorflow.python.framework.errors_impl.InvalidArgumentError: Expected image (JPEG, PNG, or GIF), got unknown format starting with 'II*\000\366_\001\000\200\000 P8$\026\r'" 에러가 발생되어 애먹고 있는데 혹시 tif 파일을 학습시킬 수는 없나요?
복사좀 되게해주세요 ㅠㅠ
답글삭제